Myself and Jeremy Long recently had a paper published in PeerJ (open access, free to read) describing the use of an Arduino microcontroller to predict tides and regulate the water levels in aquaria in synchrony with the natural tides. You can read more about that tide controller system here and further variations here.
As part of the process of putting a poster together on the Tide Height Controller project for a meeting of the Western Society of Naturalists, I whipped up a simple little 3-piece tide clock that shows a live display of the tide for a programmed site (Monterey CA in this picture). This illustrates how small and cheaply you can make a tide prediction machine.
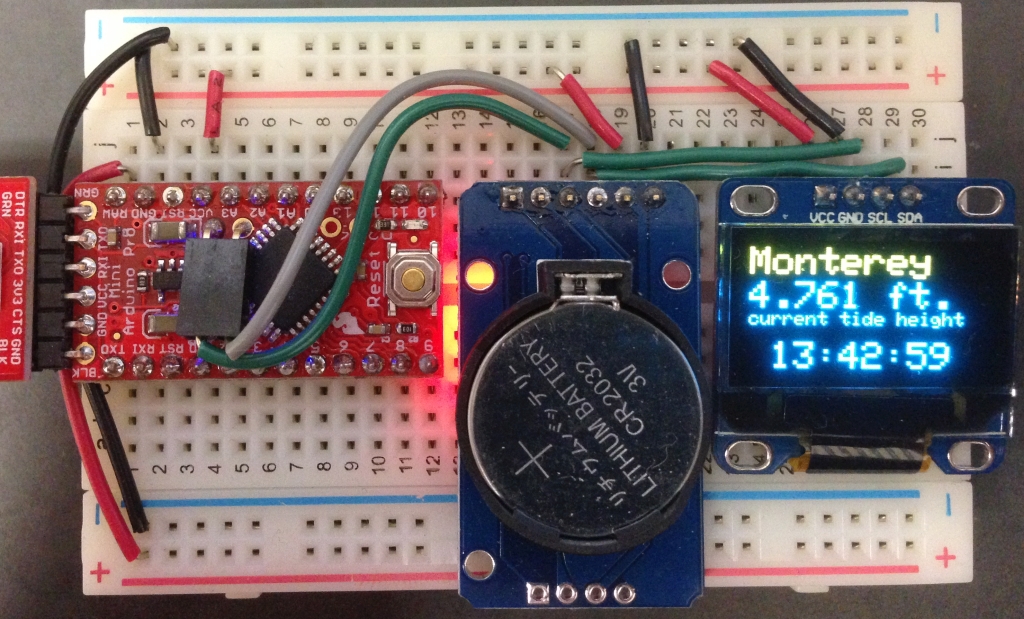
The three main parts are:
- Gikfun Pro Mini Atmega328 3.3V 8Mhz Arduino microcontroller clone. I bought a pack of three of these for $18, so one unit is about $6. This is the ‘brain’ of the operation, which predicts the current tide height for your site, based on the current time. Most of the many Arduino models and clones, including the standard Arduino Uno, can run my tide prediction software.
- Real Time Clock. The internet is rife with different versions of this basic module, which you can find on Amazon or elsewhere by searching “DS3231 AT24C32 IIC Module”. They cost about $6 or less. The microcontroller uses this to check the current time. This part runs on 3.3V to 5V power and has a backup battery so that it keeps time even when the main power is disconnected.
- SSD1306 128×64 pixel OLED display module, sold by DIYMall through Amazon, or similar clones found elsewhere. This $15 display is tiny (0.96″), and runs on 3.3V (or 5V) just like the Pro Mini microcontroller and the real time clock module. The results of the tide calculation and the current time are displayed here. This part is mainly for show, and isn’t necessary for the basic tide prediction functionality.
To create the tide clock shown above, the real time clock module and display communicate with the microcontroller board via the I2C protocol, using two signal wires. You don’t necessarily need to know anything about the I2C protocol, you just need to get the pins labeled SDA on the clock and OLED display attached to the SDA pin hole on the microcontroller (also known as pin A4 on Arduino), and the SCL pins on the clock and OLED attached to the SCL pin hole on the microcontroller (known as pin A5 on Arduino). Then all three boards need access to 3.3V or 5V power from a battery or a USB adapter (sold separately, if your Arduino doesn’t have a USB connector on it already. The Gikfun boards I used need a “FTDI” adapter, such as this or this.).
The microcontroller is loaded up with the little script I wrote to predict the tide in Monterey and display the results on the screen. The tide prediction updates every second. The code is contained in this Github repository.
The main program in that repository, WSN_tide_clock1.ino, relies on a few external libraries:
- I provide 140 different tide prediction libraries for NOAA sites around the US in this repository. This is where the library TidelibMontereyMontereyHarborCalifornia is found.
- A library is needed to talk to the real time clock module. I use the RTClib library provided in this repository.
- A library is needed to display text on the OLED display. I rely on the SSD1306Ascii library written by Bill Greiman, found in this GitHub repository. If you use a display that isn’t based on the ssd1306 controller, you’ll need a library written for your particular display.
Once the appropriate library files are copied into your Arduino/libraries directory and the parts are hooked up, you would first need to program the real time clock to the local standard time (not daylight savings time) for the tide location. This can be most easily accomplished with the example script ‘settime_Serial’ found in the RTClib example scripts.
After the real time clock is running (with its backup battery installed so you don’t have to reset it every time), you can load up the main program onto the microcontroller, WSN_tide_clock1.ino. If it is successful, the program should boot on its own and start displaying the current tide and time on the OLED display.
If you wanted to make predictions for a different site, for example the Scripps Institute pier in San Diego, you’d need to grab the appropriate library folder from my Tide calculator repository. For the Scripps Pier, it is called TidelibLaJollaScrippsInstitutionWharfCalifornia (the names are auto-generated based on the NOAA site name, which is why some are so long). That library folder should be placed in your Arduino/libraries directory. Then, the WSN_tide_clock1.ino file would need to be modified to use the new library.
Line 24 that read:
[code lang=”C” gutter=”false”]
#include "TidelibMontereyMontereyHarborCalifornia.h"
[/code]
would be changed to use the new library’s name:
[code lang=”C” gutter=”false”]
#include "TidelibLaJollaScrippsInstitutionWharfCalifornia.h"
[/code]
If using the OLED display, you will probably also want to change the site name that is displayed, by changing line 37 of WSN_tide_clock1.ino:
[code lang=”C” gutter=”false”]
char siteName[11] = "Monterey";
[/code]
You can enter anything in the quotes, but the little 128×64 OLED display I used only has room for 10 characters for the site name.
[code lang=”C” gutter=”false”]
char siteName[11] = "La Jolla";
[/code]
That’s the process I used to create a little real-time tide prediction clock. It will run completely unattended with just a battery pack, and doesn’t need any connection to the internet or a computer once it’s programmed and the real time clock has the correct time.