iButton temperature dataloggers are tiny, long-lived temperature sensors that are great for all kinds of environmental and biological monitoring, but they’re a long ways from waterproof. Old farts will regale you with tales of a bygone era when you could leave a bare iButton submerged in seawater for months at a time without problems, but those days are long gone, due to a re-design in the early 2000’s. Nowadays you can’t even get away with leaving them in moist soil without eventual water intrusion, component failure, and data loss. But given their tiny size and relatively low price ($15-20 each, depending on order quantity), it’s hard to let them go. Over the years, folks have come up with ways of waterproofing iButtons to put up with varying amounts of moisture exposure (see articles here, here, and here. The first two links are behind a paywall). There’s not a whole lot of magic to any of these techniques:
- Buy the official iButton-branded waterproof capsule that massively increases the size of the iButton
- Deploy the iButton in a small Falcon tube or other handy containers found laying around the lab
- Paint nail polish or smear glue around the seam between the two halves of the iButton
- Wrap the iButton in layers of parafilm
- Dip the iButton in Plasti-Dip rubberized tool handle coating
- Dip the iButton in wax
The Plasti-Dip solution probably gives the best balance of durability and small size, with the main downside being the need to peel off the coating when you want to download the iButton. For our current project, I’m launching, deploying, and downloading 288 iButtons every 17 days, so peeling and re-coating that many iButtons would be time-prohibitive. Instead, I coat iButtons in wax, which is less durable, but far easier to read and repair. I can get away with wax because we mount our iButtons inside a cavity in our experimental plates where they are protected from abrasion.

The wax I use is called M-Coat W-1, sold by Vishay Micro-Measurements corporation. There’s nothing particularly fancy about it, except that it melts at a relatively low temperature of 75°C. iButtons have a maximum temperature limit of 85°C, and heating them up much beyond that would probably do bad things to the internal battery.
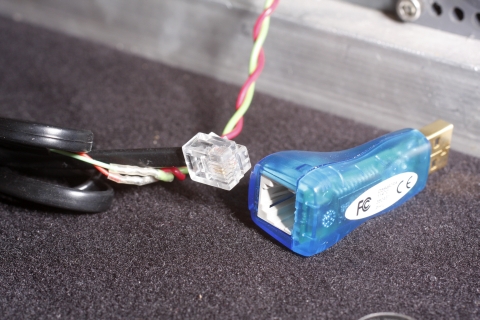
Coating the iButton in wax is the easy part, and the obvious next question is how to launch and download it when it’s covered in wax. If you own iButtons, you probably have a reader that the bare iButton snaps into. That reader interfaces with the computer via a USB dongle, like the one pictured below.

The DS9490 USB adapter is available for about $35, and has a plug that matches a standard old 2-wire telephone cord. You probably have several of those old phone cords laying around, since you still get one every time you buy a battery-backup UPS for your computer. If you cut one end off the cord, plug it into the DS9490, and touch the bare wire ends to the two sides of the iButton, you should be able to read the iButton using the standard software. If the software doesn’t recognize the iButton, try swapping the two wires on the two sides of the iButton. Now that you’ve learned just how simple it can be to read an iButton, the next step is to build your own waxed-iButton reader.

My reader for waxed iButton is essentially a giant clothespin that clamps on the wax iButton. This is because my first prototype was a real wood clothespin with thumbtacks stuck through the ends to pierce the wax, and wires connecting the thumbtacks to the USB dongle. On the giant clothespin you can see the red and green wires running from the tips of the clothespin to the DS9490 USB dongle. Using the wooden clothespin wasn’t going to last for hundreds of iButtons, so I made the bigger version shown here.

In the closeup picture, you can see the little metal spike in the middle of the cup on the end of the clothespin. It’s made out of a stainless steel screw that I sharpened on a grinder and then screwed into the plastic, sandwiching the connecting wire in the process. A matching screw is mounted in the top jaw of the clothespin, attached to the red wire.

I set iButton in the cup, and the rubber o-rings pull the jaws closed. The sharpened screw tips are just long enough to pierce through the wax and touch the underlying metal case of the iButton. Once you’ve achieved contact with the top and bottom of the iButton, the iButton software should be able to read the unit like normal.

After reading the iButton, you’re left with two small holes in the wax. Those holes should be re-closed to make the iButton waterproof again. You can do this with a warm finger to smoosh the wax back over the holes. Of course that’s not fancy enough for me, so I built a thermostat-controlled wax heater and hot plate to do the same job, which is handy when I have to go through hundreds of iButtons.

With this setup, I can launch my 288 iButtons in roughly 3-4 hours while making use of the R scripts I have detailed here and here to automate the process of launching or downloading the data. Below is an example of downloading 288 ibuttons in about 87 minutes, with breaks in between to help identify some snails and measure for new window blinds.